 AA Global
 No Raid, No Trade: Liquidity & Raids Explained (Free Guide)
Key takeaways
- Liquidity is the stops resting under swing lows and above swing highs
- A raid is price sweeping through those stops on purpose, then snapping back
- The sweep is the fuel: it is where the real move gets its orders filled
- Only trade a fair value gap that forms AFTER a raid; a gap with no raid is low quality
- Before any setup, ask one question: where was the raid?
- A raid alone is not a signal: after the sweep, price must react with strength before you trade it
- No structure shift and no displacement means the sweep was a pit stop, not a turn
- When the reversal fails, the trade is the continuation to the next marked level
The rule: no raid, no trade
The single change that cleaned up my trading more than anything else was refusing to take a setup unless a raid came first. Not a fancier indicator, not a new pattern, just one filter: has price swept liquidity yet? If the answer is no, there is no trade. Here is what that actually means on a chart.
Step 1: Liquidity is resting stop losses
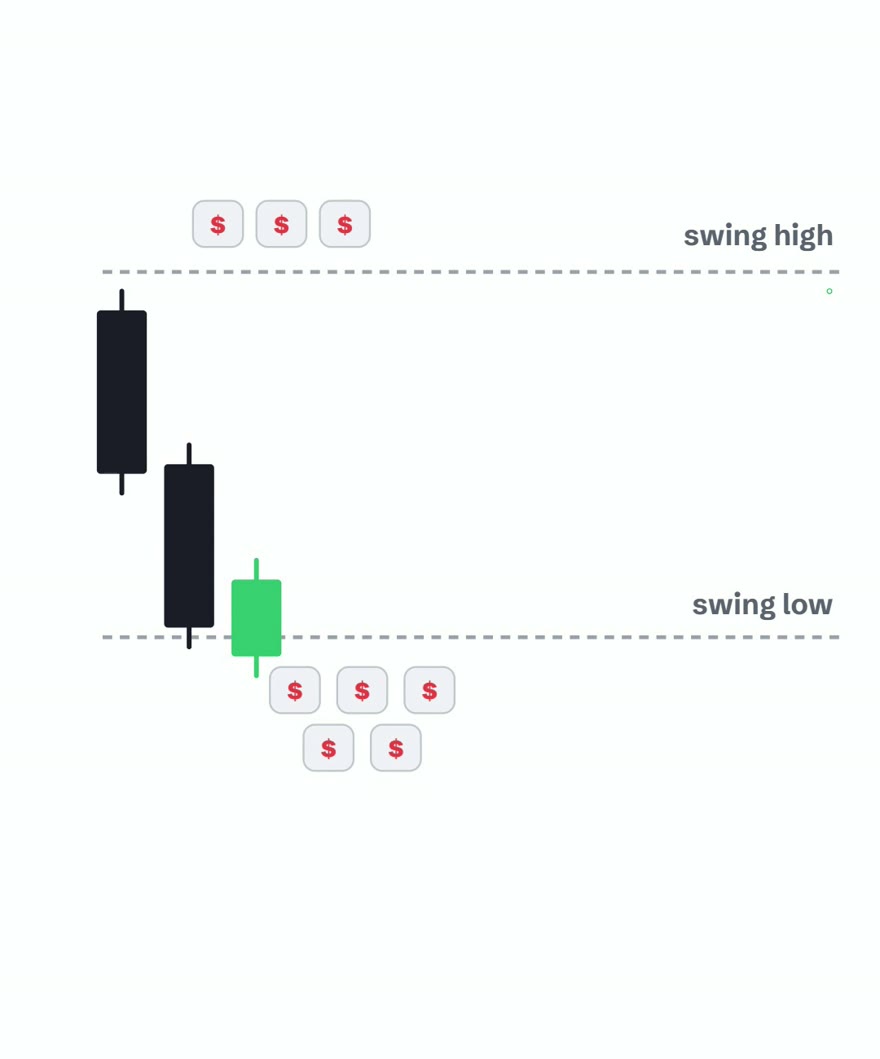
Every obvious swing point has orders parked just beyond it. Under a swing low there is a pile of stop losses, from longs protecting their trade and from sellers who want to short a breakdown. Above a swing high, the same thing in reverse. Those resting orders are liquidity, and the market moves toward them because that is where the fills are.
Step 2: The low is set first, then targeted
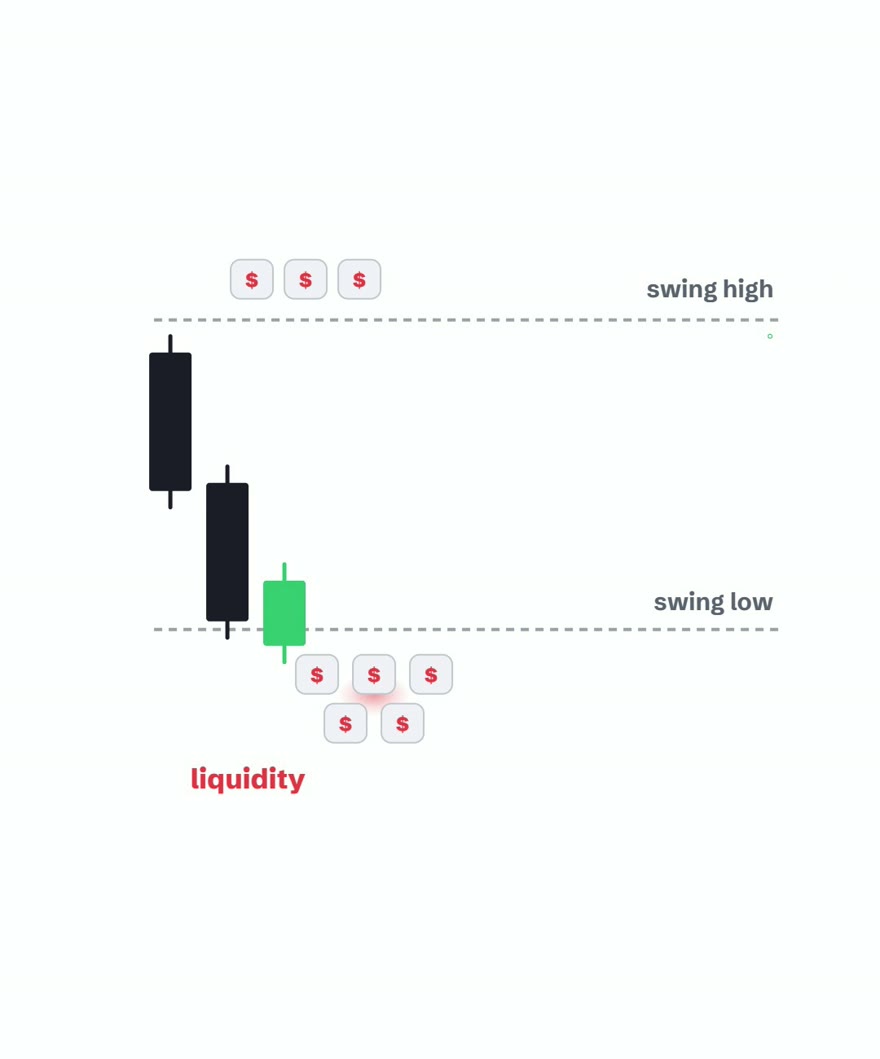
This is the part most people miss. A swing low forms first, price rallies away and builds a swing high, and then it turns back down and heads straight for that original low. It is not random. The market knows the stops are sitting there, so it comes back to collect them.
Step 3: The raid sweeps the stops
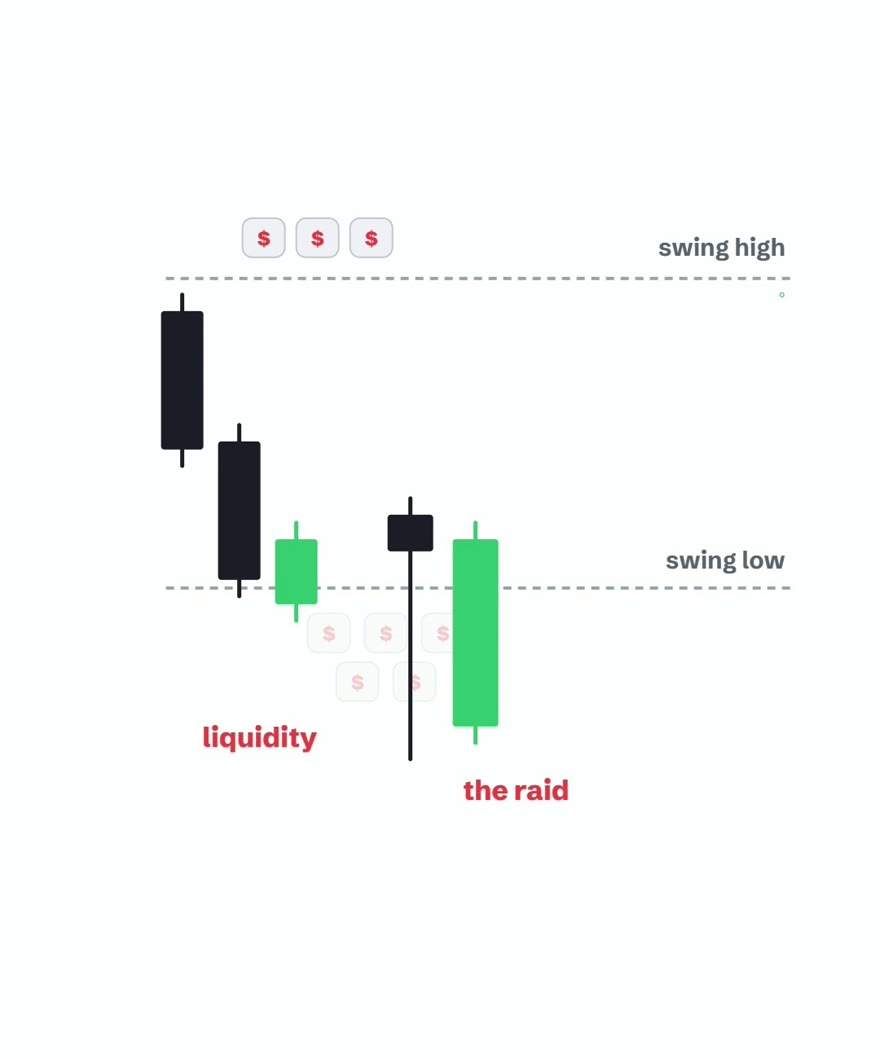
A raid is price running into that pool on purpose. You see it wick through the swing low, trigger every stop resting beneath it, and then snap right back above the level. It looks like a failed breakdown. It is not a failure, it is the setup. That sweep is the fuel for the real move, because the orders it just triggered are what the other side uses to fill.
Step 4: Trade the gap that forms after the raid
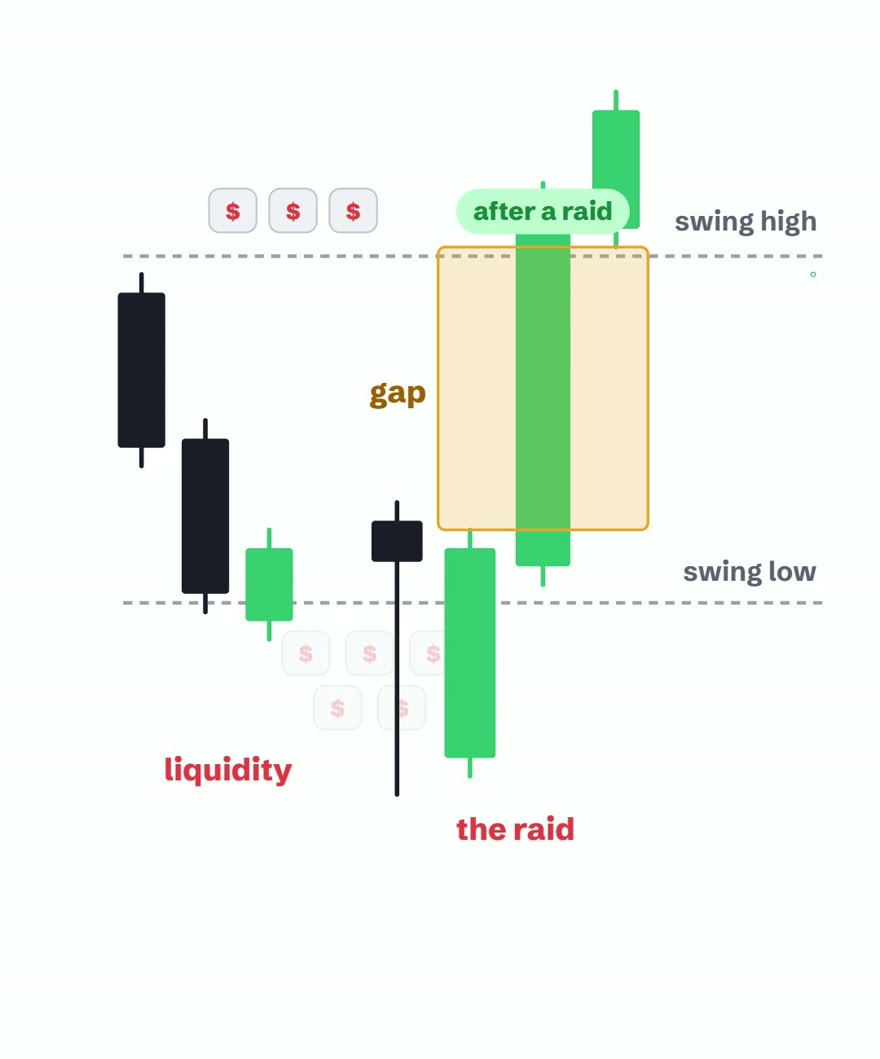
The reversal off a raid is usually fast and one-sided, and fast moves leave a fair value gap behind. That gap is high quality precisely because a raid came before it. When price pulls back into the gap, you enter with the move. If you want the mechanics of that entry on their own, read the fair value gap entry guide.
Step 5: No raid? Skip it
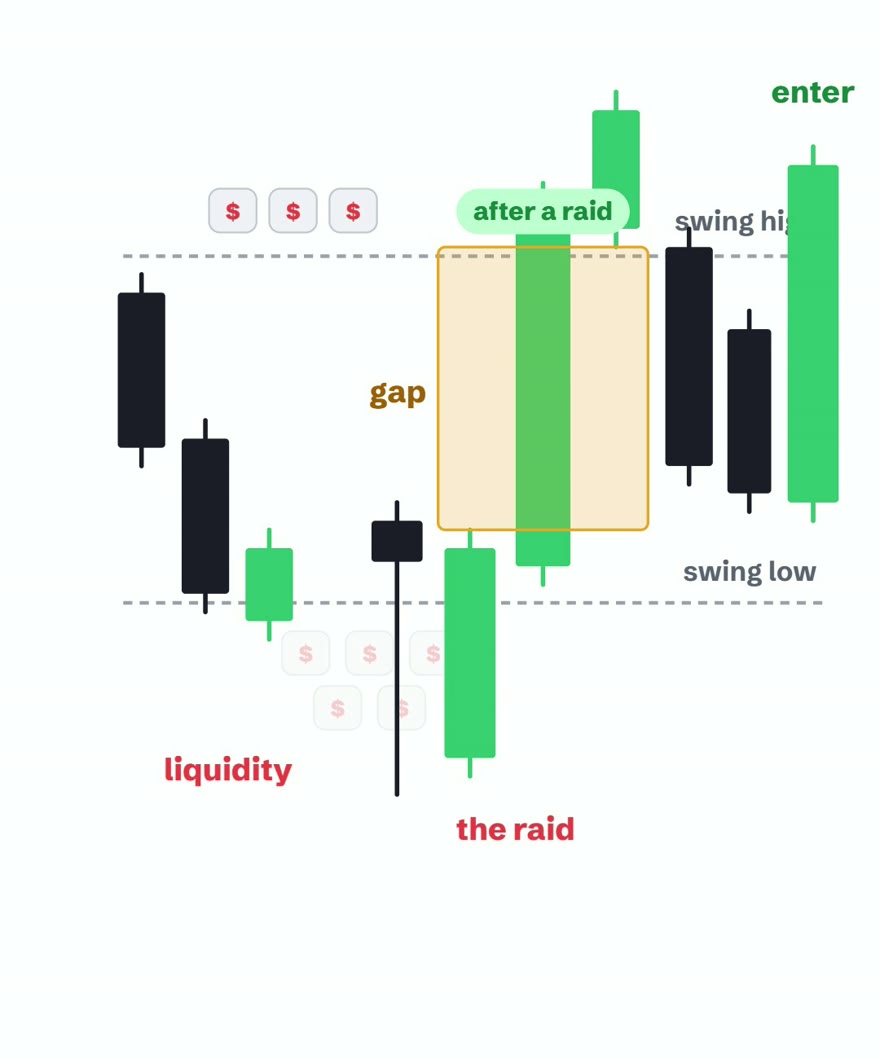
Now the filter. A gap that forms with no raid behind it has no proven fuel. Nothing got swept, no stops got triggered, there is no evidence anyone with size stepped in. It might look like a perfect setup, but it is exactly the kind that traps you. Skip it and wait for the version that has a raid underneath.
Step 6: Ask one question before every trade
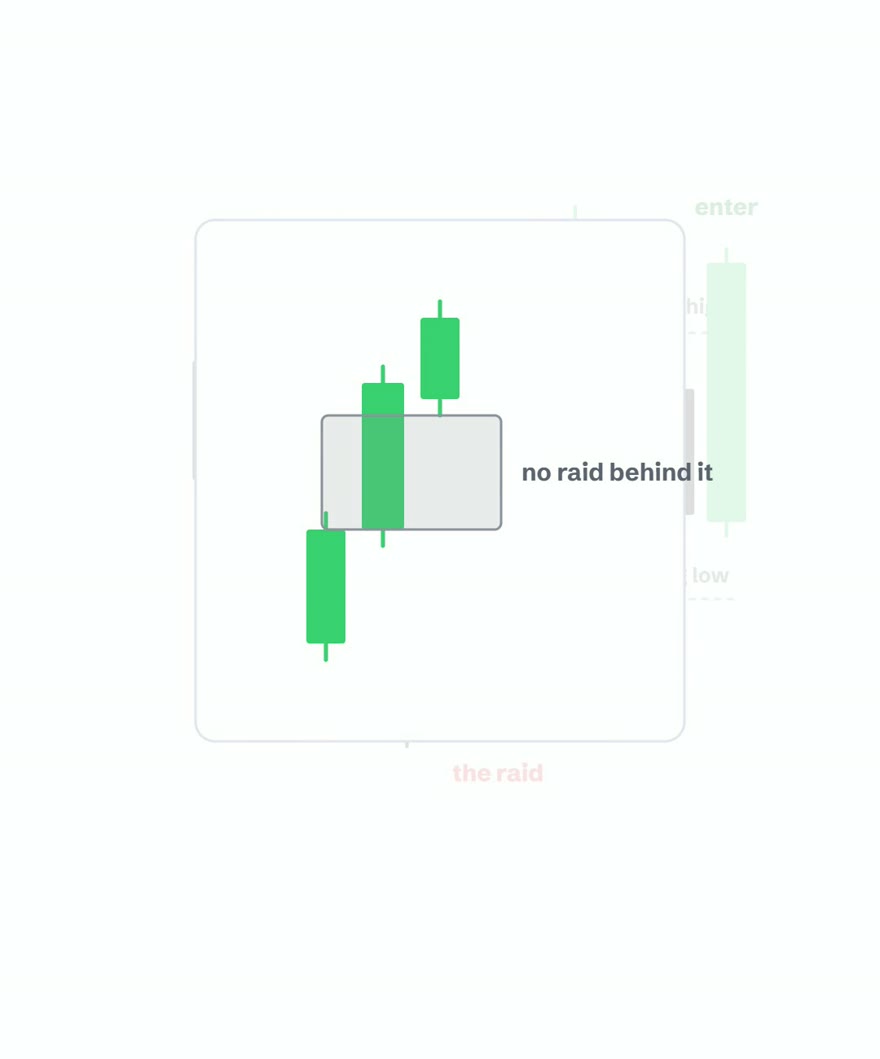
Before you touch any setup, ask where was the raid? If you can point to the swing that got swept, you have a trade worth taking. If you cannot, you do not have a trade, you have a hope. No raid, no trade.
The raid that never reverses: the 2022 model trap
Everything above tells you to wait for the raid. This section covers the mistake most traders make right after it, because a raid on its own is not a signal. The sweep is the invitation. The market still has to accept it.
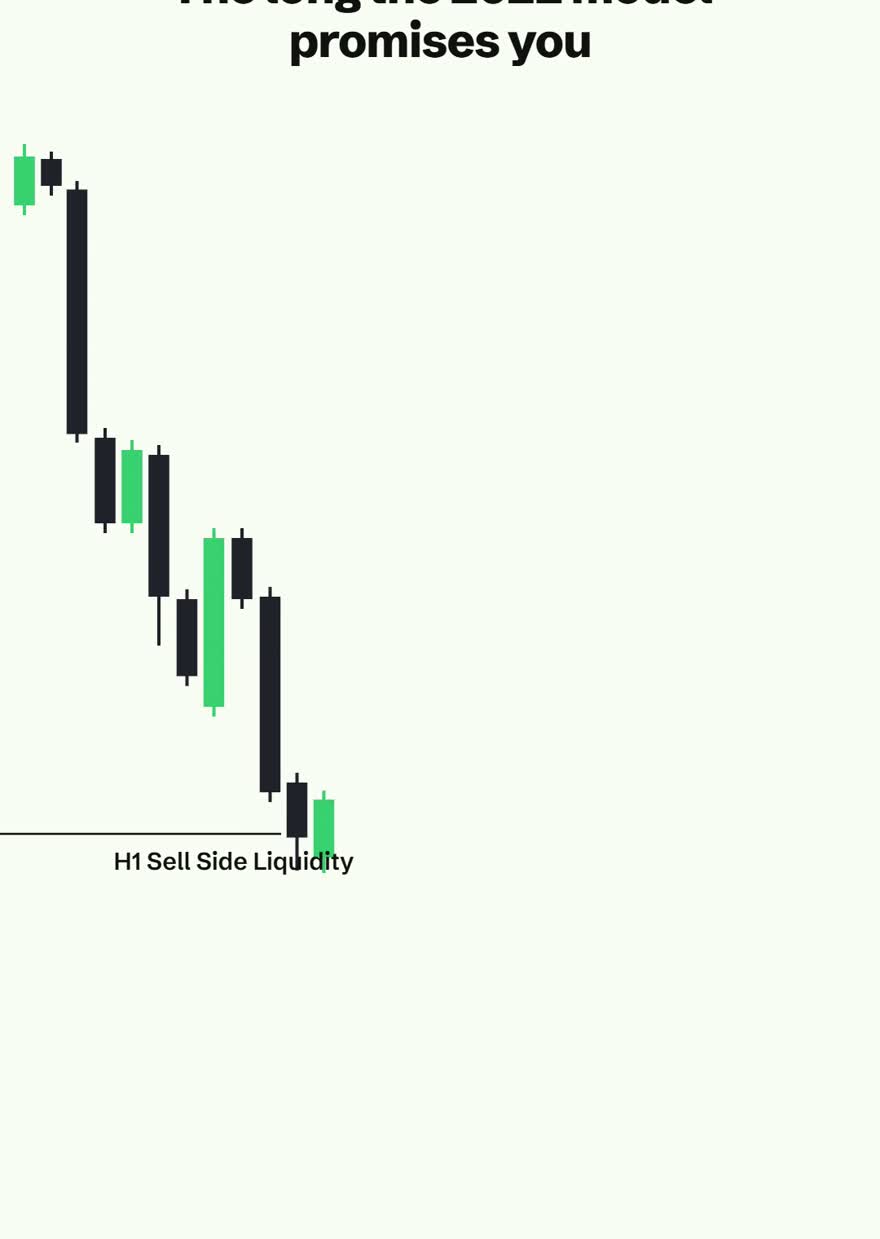
Price sells off and runs a low, in this example the sell side liquidity from the hourly chart. If you trade the popular 2022 model, this is the moment your checklist lights up: the sweep happened, so now you wait for a structure shift and buy the fair value gap it leaves behind.
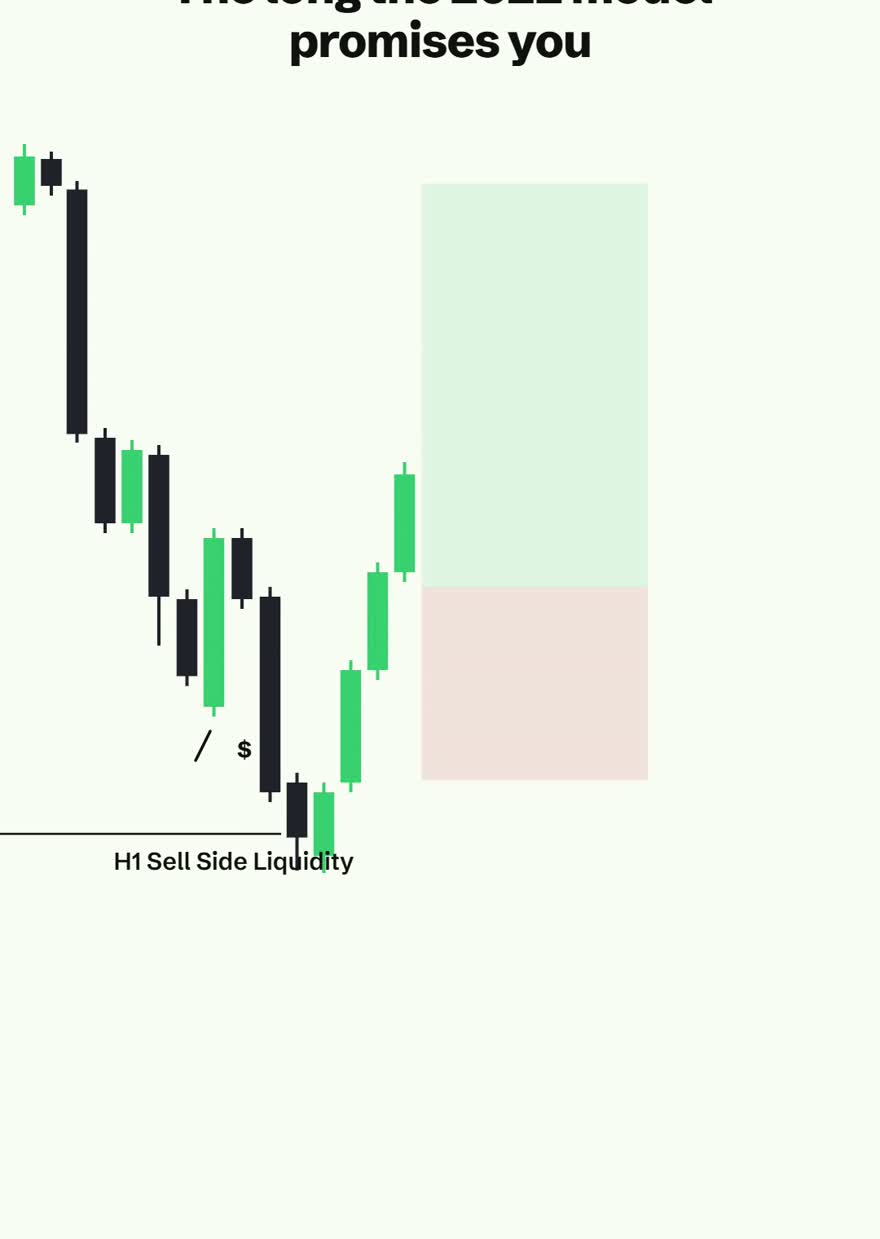
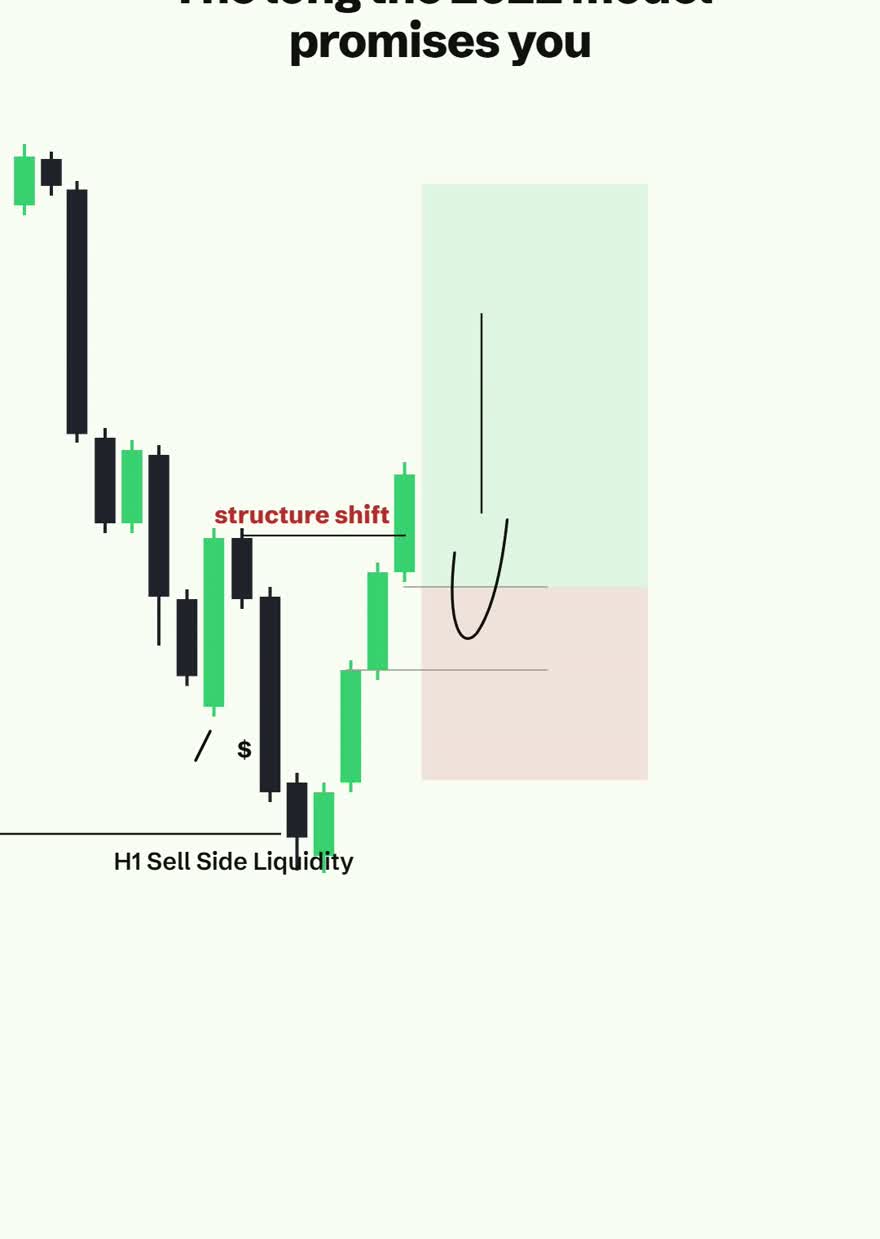
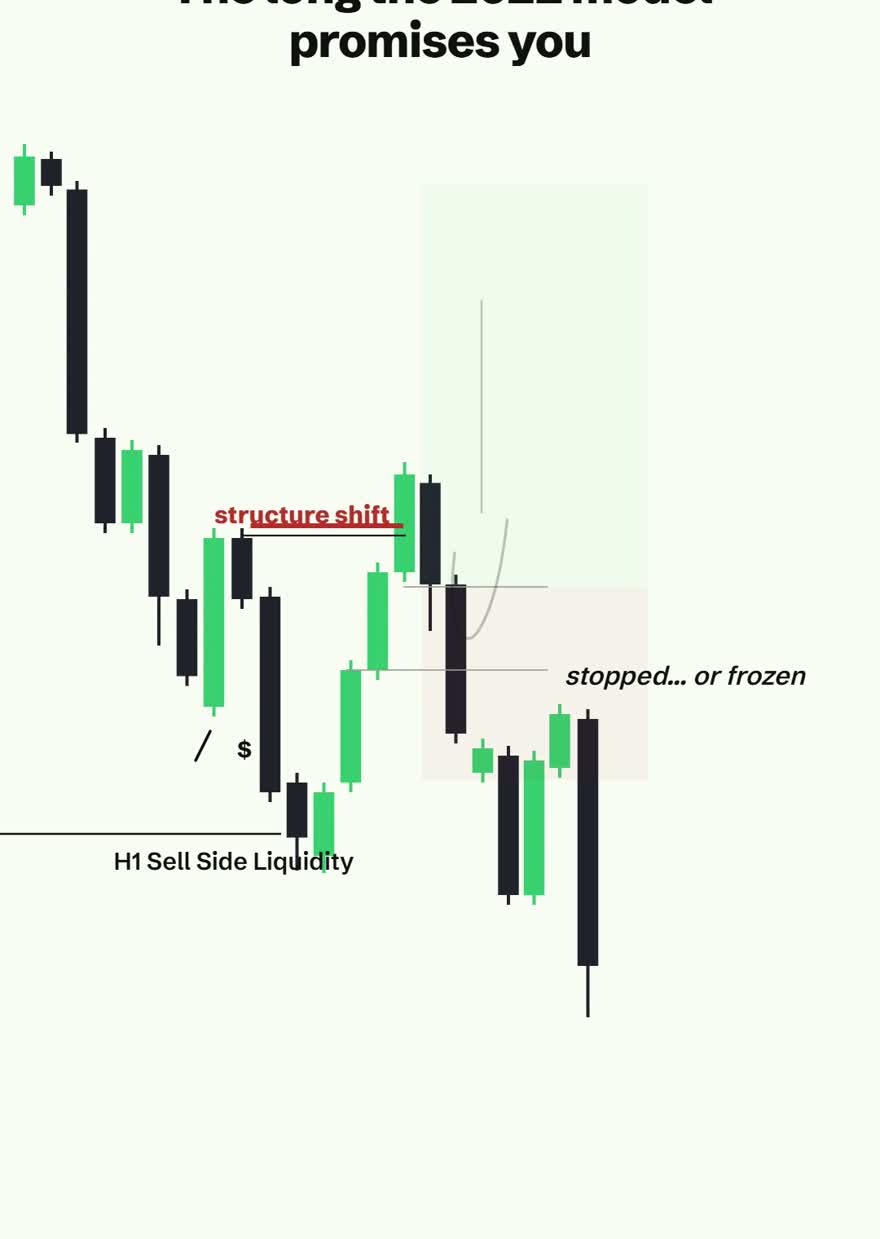
Watch what actually happens. There is no structure shift, there is no displacement, and there is no momentum behind the bounce. Price drifts sideways into the zone and then keeps on dropping, straight out of the bottom of the setup.
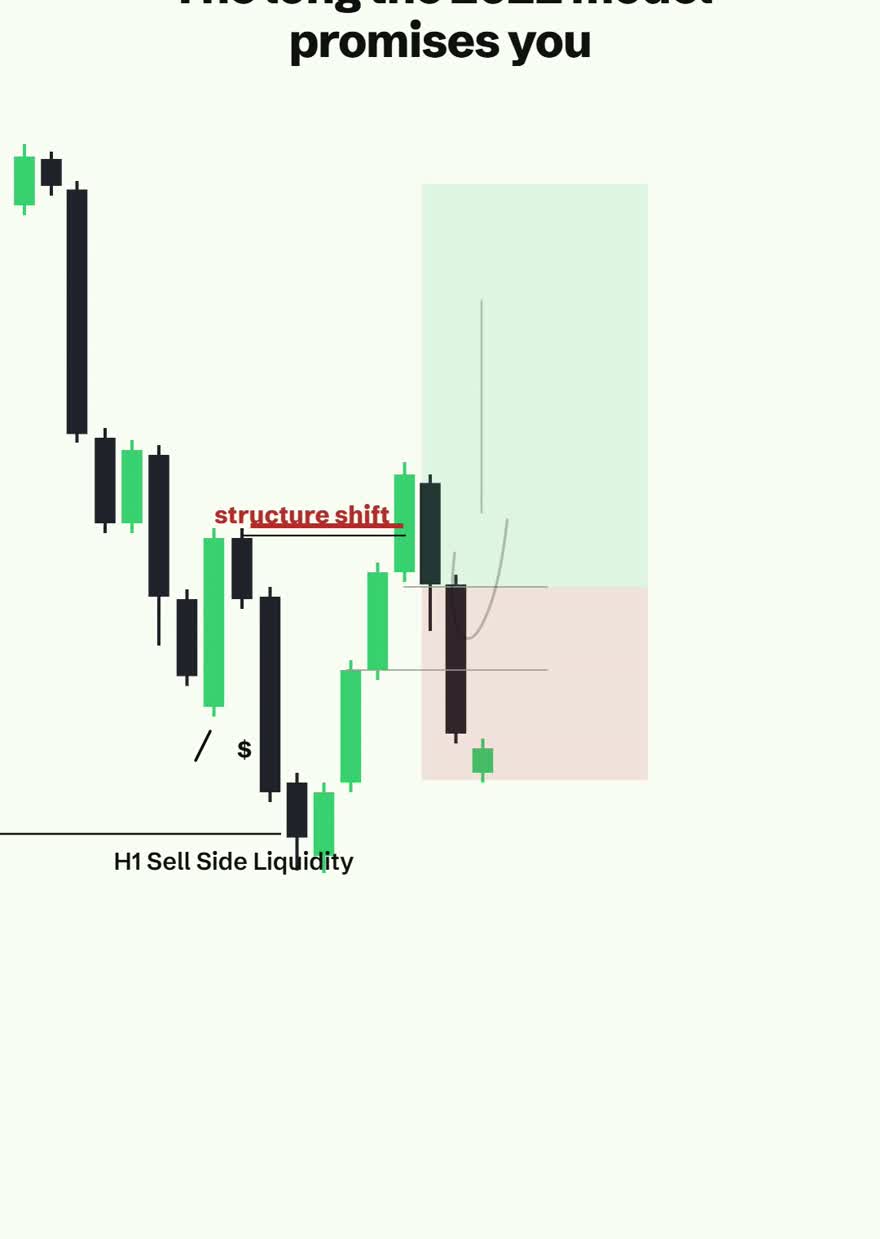
This is where most ICT traders lose, and it is not because the concepts are wrong. It is because they treated the sweep as the trade instead of as the first half of a question. The question is always the same: did price react with strength? If the answer is no, there is no trade, no matter how clean the sweep looked.
Reading the same move correctly
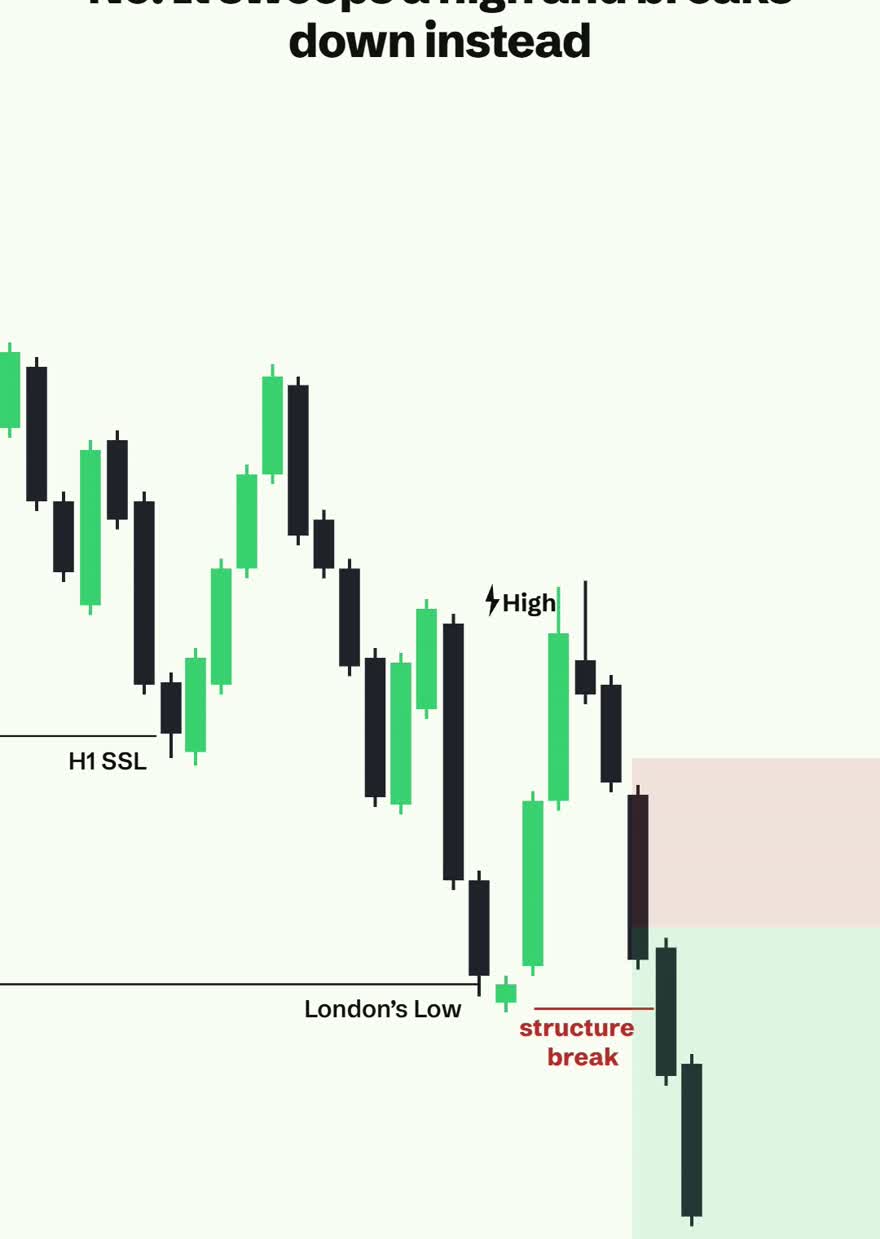
Played properly, you wait for price to trade into a level that actually matters, here London's low, and then you slow down and ask the question. The reaction is weak, and instead of reversing, price sweeps a minor high and breaks structure lower with real displacement behind it.
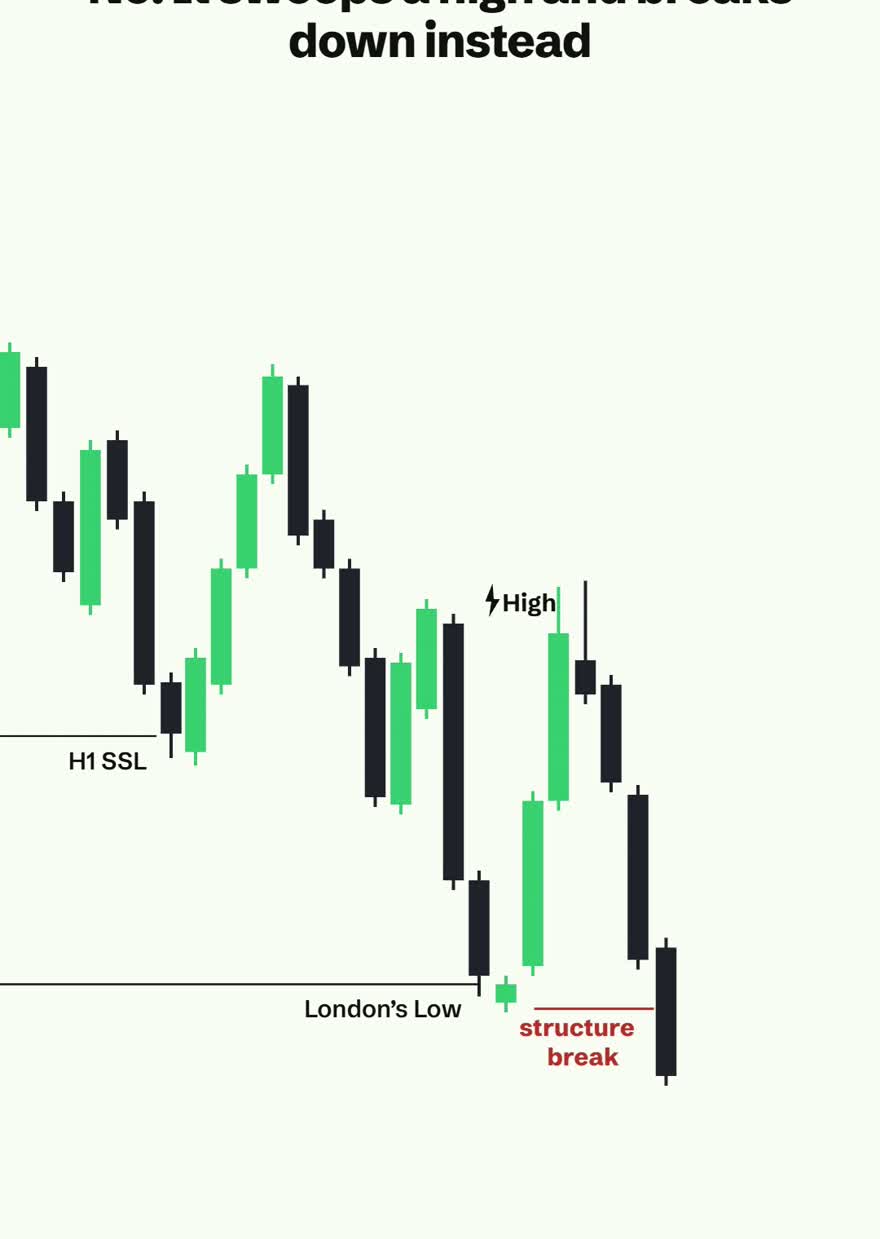
That is the trade. The break has force, everyone who bought the first sweep is trapped above, and the target is already on the chart: the previous day's low sitting to the left.
The checklist that separates the two
- The raid happens. Do nothing yet
- Ask: is price reacting with strength? You need a structure shift with displacement, not just a bounce
- If the reaction is real, trade the reversal exactly as the steps above describe
- If there is no displacement, the sweep was a pit stop, not a turn. Stand aside or trade the continuation
- Either way, your target is the next level already on your chart
Trade the market for what it is doing, not for the setup you wanted it to give you.
Watch it play out both ways
Watch the full breakdown
Before you trade it
Drill the raid-and-retest entry on the free entry trainer, run every live setup through the pre-trade checklist, and if the terms here are new, build the base with the free beginner course first. Then 20 demo trades before a cent of real money.
Try trading free, $10,000 virtual demo →Frequently asked questions
What is liquidity in trading?
What is a liquidity raid or sweep?
Why does no raid mean no trade?
How does a raid connect to a fair value gap?
Which swing low gets raided?
Why did my trade fail right after a liquidity sweep?
What confirms a real reversal after a raid?
What do I do when the reversal never comes?

Keep learning
Raids set up the entry, and the entry itself is the fair value gap guide. To mark the swings that get raided in the first place, read how to mark swing points correctly. New to trading entirely? Start with the free beginner course.